Showing posts with label Puppets. Show all posts

Monday, June 4, 2012

Making of the Puppet: Face replacements

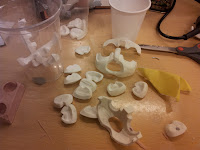
Using face replacements gives the animator a small library of expressions, which can be combined together in a big variety on the puppet. For our story, it was really necessary to have this library so the mans expressions could more easily be shown, since the film relies mostly on body language and almost no dialogue.
It has been a while since we made the face replacements, 
but here is a small tutorial how approached it:


The inside of the head was carved from balsa wood, 
with a silicon eyesocket to keep the eyes in place. 

The head was then sculpted in Super sculpey firm and Milliput. The head was sculpted without
mouth shapes or eyebrows, the upper jaw helped the moth to later be sculpted in right place.
The parts that were to be replacable were then cut out. 
Imperfections where then fixed smoothed out with milliput and sandpaper.


We made a silicone negaive for each part. The different parts were then casted in plastic.


We made two versions of the main character so that we could animate on two sets at the same time. 
Magnets were used to keep the parts in place.

Different expressions where then sculpted on top of the parts.


Layers of white spray where applied before painting the final color.


Credits to Joshua and Nathan Flynn, 
who shared their way of making face replacements on their blog.

Monday, May 28, 2012

Screenshots from the film

Since we don't have time to publish any longer posts this week, 
here are three screenshots from the film!


Thursday, April 5, 2012

Making armatures part 2!

Most of the puppets are allready done and some are only missing some few stuff, like hair.. 
So some pics here is kinda old but whatever. As earlier written we tried to go for allot of replacement parts and we're both really happy for making that choice because things have broken allready! 


Heres some steps on the replacement process.


 By using a dremel connected to a stand thingy its a higher chance of the drillbit not to break because of an unsteady hand..


Then we pulled wire through and bent it so it stays locked. 


It works quite well but we experienced that the joints sometimes still got a little loose. To fix this we just applied a tiny amount of super glue . It stays in place and if its necessary to remove the joint its no stress.

It didnt take long into the animation before the man had an accident..


The poor man is clearly shocked for breaking his foot. But dont worry manio!


Earlier we had just two wires for one leg. This was not enough because his head became much more heavy than expected.
So after allot of drilling, cutting, twisting, milliput and epoxy glue both versions of the man got new legs.
We increased the wires to 5 per leg, so this is hardcore! The area where it bends is small aswell which is not good for the wires since all the pressure gets forced to one spot. This is something we just gotta live with since we wanted it so small.. :P But if they break we've made it even easier to switch them out! The wire now has two ends with K&S (not fully pictured) one slides into the shoe and the other up on the leg. Hopefully this works :)

Cheers

Sunday, February 26, 2012

Sending away the Man!

The man's shoes and pants are now finished on the main character and he is now ready for a trip to Sweden! We bought thin wool yarn and are now sending him to Annas sister, Martha Mantzaris. Martha is really good at knitting and also at making miniature things, she will knit a small cardigan for both copies of th main character. We are really happy to have her heping out and we are looking forward to see how he will look when we get him back again!

Monday, February 6, 2012

Making of Creatures part 2


 Some weeks ago we finished the creatures. From the left it is the neighbour womans creature, sitting creature and two of the standing creatures in different sizes. Depenging on the intensity of the scen the creature will be bigger/smaller, this will also add to the surrealistic feeling of this character.
The inside of the body is from balsa wood and foam. The rest is made with the techique call felt making. We used soft soap and water to shape head feet and arm shapes that we "dressed" the creature with. We also made a big flat piece that we used for the skin, the we putted the pieces togheter and shaped it more with a felt making needle.

 
 Making the arms and legs for the creature.


Sitting Creature Turnaround


Sunday, January 29, 2012

Eyes for Stop Motion puppets

We wanted quite realisitic eyes for the puppet. This is the technique we are using, which is easy to do and looks good!
We used wooden beads and sandpapred them flat where the iris is going to be. We used milliput to fill the hole in the beads, and made a smaller hole with a needle.
Then we painted black in the holde and where the iris will be, the rest is painted white.

 We printed a photo of eyes, cut them out and glued them on the bead.


We covered it with some layers of transparent nail polish, and then finally made the hole through the nailplosh. When we are animating we will just put in the needle and move th eye!


Monday, January 16, 2012

Making of Creatures part 1

While waiting for the wool, here is some text and pictures from the process so far:

The legs are made with ball and sockets since they are so short they needed to be easy animated. The rest of the body is with wire and k&s tubes. The head is made of styrofoam and coated with a layer of wood glue.


 We made a part of the stomache in balsa wood. If the whole puppet was soft we would defom it a bit while bending and animating it, this might look wobbly and not so good. Having the hard head and somache makes us able to bend it without deforming it - and still keping the light wieght.


Then we added foam. The foam is less compact than the wool and the puppet will therefor be more easy to bend.

Now we are waiting for the wool that w ordered... Then there will bemore posting of the felt making!

Sunday, January 15, 2012

Main character armature! With Ball & Sockets! yay!

We're done with the armatures for the main character! We're making two puppets of him so we can both animate at the same time :)


 The ball & socket parts needs to be soldered together.

 Here we're working on the hip section. Soldering k&s with the steel rod. Not so easy to do since the steel takes more time to get hot. Just using epoxy its a higher chance for it to disassemble itself. The hip part needs to be quite strong. Left pic is before and right is after..

 We were supposed to use ball & sockets for the feets but the design is smaller, so we had to go with wire. The feets are replaceable. And to make them not slide out we drilled a hole in both and put a wire thru with same thickness. We usually go with 1,6mm

 Here they are! We havnt made his hands and head yet but its coming :) The arms are allso just wire. Same reason as with the feets, the design is quite thin so ball and socket would be to big..

Allso added balsa wood parts so it will be better to hold when animating. Balsa is really light and easy to cut and it can handle different glue and chemicals better than for example styrofoam.
Theres allso a balsa part in the neck/shoulder area, just didnt have a picture of it now. 

It was really fun to make and will be interesting to animate with!

Thanks!

Wednesday, January 11, 2012

Armature Gold!


Ball and sockets for the armatures has arrived! We concidered a lot if we should buy it or not, but we decided that we wanted to try it out. We started soldering the parts together, and its going quite well. Ball and sockets won't be used for the whole armature. We want small feets and arms so here ball and socket would be too big.
Here is one ball soldered to a steel rod.

Action in the workshop!

Friday, November 25, 2011

Secondary Characters

 Puppets with foam on them. From left: Neighbour Father, Neighbour Child, Janitor and Neighbour woman. On monday we will start with the heads!


Armatures for the secondary characters. We used shrink tubes around the wire ad k&s pipes for the joints. The puppets have replacable arms, legs and hands, mostly becuse we wanted to try it out and test for the main character.

Creature Material Test


A small test-creature to find out what material use for it. Since the creatures should feel a bit surrealistic, we wanted something that stands out from the rest of the movies universe. We were thinking of knitted or textile. But after trying feltmaking with wool, we loved it and decided to go for that techinque!

Tuesday, November 22, 2011

Making the armatures

We started to make the armatures for the secondary characters. Here is the Janitor in production, with a rig for the scene where he is going to fall.