
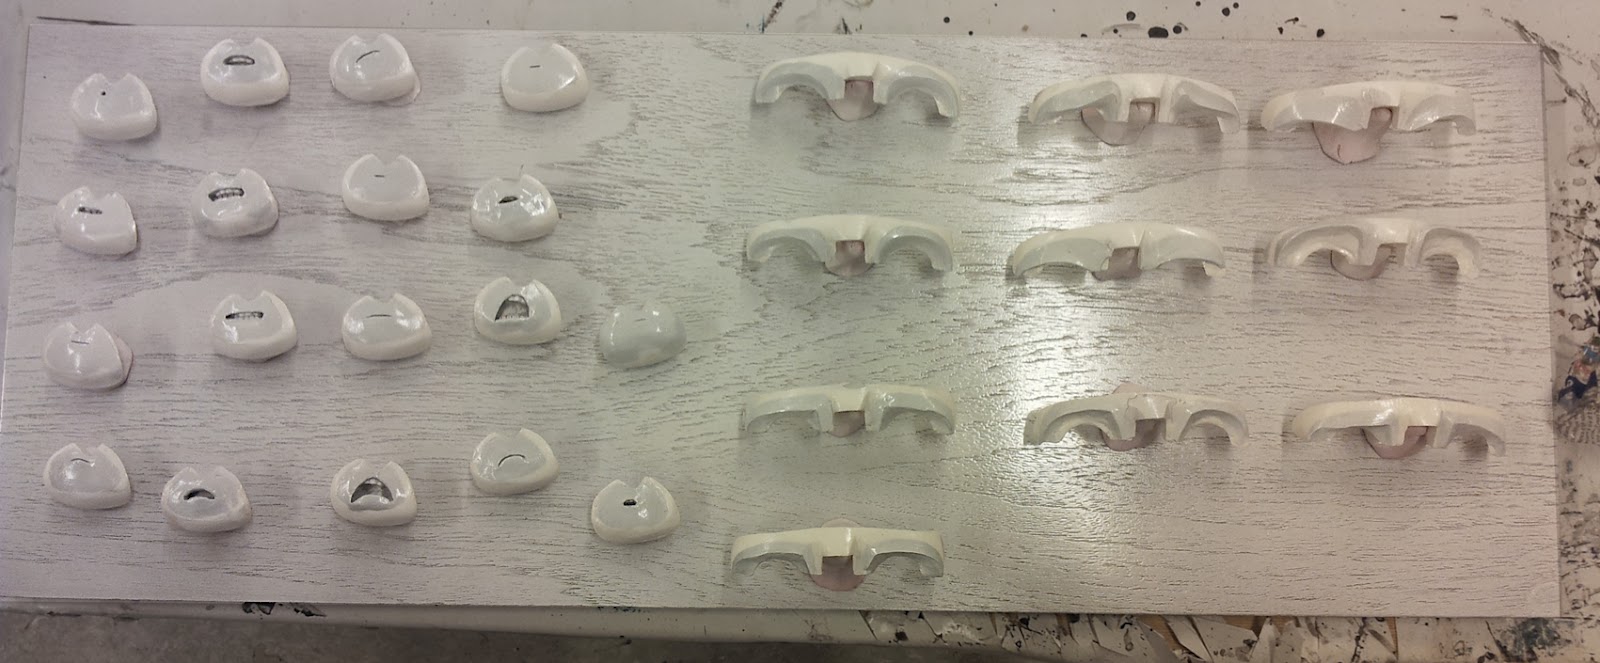
Using face
replacements gives the animator a small
library of expressions, which can be combined together in a big variety on the
puppet. For our story, it was
really necessary to have this library so the mans expressions could more easily be shown, since the film relies mostly on
body language and almost no dialogue.

It has been a while since we made the face replacements,
but here is a small tutorial how approached it:
The inside of the head was carved from balsa wood,
with a silicon eyesocket to keep the eyes in place.


The head was then sculpted in Super sculpey firm and Milliput. The head was sculpted without
mouth shapes or eyebrows, the upper jaw helped the moth to later be sculpted in right place.
The parts that were to be replacable were then cut out.
Imperfections where then fixed smoothed out with milliput and sandpaper.


We made a silicone negaive for each part. The different parts were then casted in plastic.


We made two versions of the main character so that we could animate on two sets at the same time.
Magnets were used to keep the parts in place.
Different expressions where then sculpted on top of the parts.

Layers of white spray where applied before painting the final color.

Credits to Joshua and Nathan Flynn,
who shared their way of making face replacements on their blog.
Wow!! This is great!!!!
ReplyDeleteThank you for your help!
Glad to help :)
ReplyDeleteHi Anna and Eirik! I'm currently about to go into my 3rd year at the university of Glamorgan doing stop motion and I'm in love with your film! I was wondering if you had any tips or tricks on how you made real hair on your puppets? Thanks a lot, James.
ReplyDeleteHey James and thank you for taking interest in our project! :)
DeleteFor the hair we used a lot of my hair and some of Annas. I looked so ridiculous after all the donations I had to go straight to the hairdresser..
Anyway, we started out in the lower end of the head and worked our way upwards, creating a line around the scalp. Taking small chunks of hair with glue at the tip and applied to the head.
When we reached the wanted hairline we applied another layer above which then overlaps the layer underneath. Not taking it too near because the hair will look really thick but its something you will notice and see yourself.
Its kinda tricky when you come to the top. Eventually you gotta lay some smaller chunks down with some glue in the middle. It looked quite good.
When we were done the man looked like a long haired hippie so we gave him a haircut how we wanted it..
To get the hair to stay in position you can use hairspray. Just cover his face, no one like to get that in the eyes.
We checked out your fisherman film, great work dude!
Say hi to Matt and Nicola from me if they are still there. I was there on exchange in 2011 :)
And good luck with your graduation film! :D
Cheers
Eirik and Anna
Im thinking the same thing! Grow my hair for a few months then cut it all off for puppets.
DeleteAmazing! thank you so much. I really want to try and get a nice hand built feel to my film this year and real hair seems to do that.
I will do, they're still there. We found your film 'the crow who wore a suit and works in an office' online and noticed the CA306 on the number plate of his car and figured it couldn't have just been coincidence. Was it your work as well that Reuben Loane worked on for his showreel with the three soldiers??
Thanks again
James
Hehe yea spent some hours in there so almost had to bring the room nr along.. :P
DeleteNo that was for my friend Simon's film Freighter. Its a music video and you can see it here https://vimeo.com/29653771
Looking forward to see the final work :)
Cheers
Eirik
Gracias por compartir sus conocimientos. Saludos desde Jujuy Argentina
ReplyDeleteI really enjoyed your blog, thanks for sharing
ReplyDelete